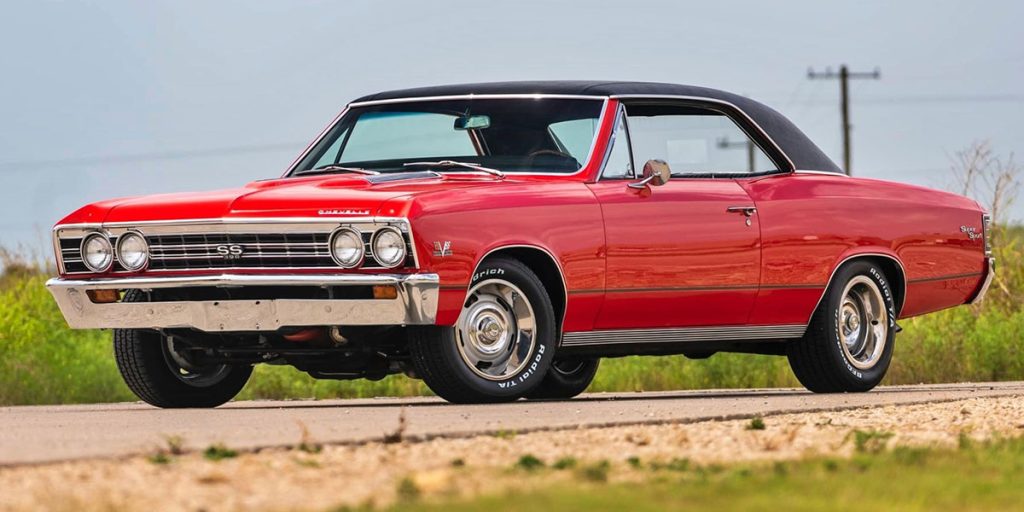
Easy Steps to Make Your Car Run Smooth

You don’t have to be a car expert to make your engine run smoothly. If you’ve noticed your car is a bit shaky, adjusting the carburetor could be the key. The good news is, that it’s simple and requires no fancy tools. Let’s go through the steps to ensure your engine runs smoothly for a long time.

Adjust Idle Air and Fuel Mixture

Carburetor Adjustment
Holley Carburetor

One thing to note here – this only adjusts the air/fuel mixture at idle. Once off idle, the main jets take over which is a different adjustment. Also, it’s crucial to make sure that your timing is set properly before making any of these adjustments. To learn how to check the timing, check out our article here, ‘Clear Cut: Setting The Ignition Timing‘.

  1. Locate and Remove the Air Filter: Find your air filter under the hood, unscrew the wing nut, and remove it. This exposes the carburetor for adjustment.

  2. Find Adjustment Screws: Look for flat-head screws on the front of the carburetor for an Edelbrock carb, or on the sides for a Holley carb. These adjust the air and fuel mixture. Use a screwdriver to turn them.

  3. Warm Up the Engine: Start the engine and let it warm up to normal temperature. Listen for sounds that indicate whether it’s running too lean or rich. A vacuum gauge will help immensely with this. 

  4. Adjust Screws Equally: Turn both screws equally until you find the right mixture. The engine should purr smoothly. If it’s too lean, add more gas; if too rich, reduce it.

  5. Replace Air Filter: Put the air filter back on once the carburetor is adjusted.

Adjust Idle Speed

  1. Remove the Air Filter Again: Take off the air filter to access the carburetor.

  2. Find Idle Adjustment Screw: Locate the idle adjustment screw. This sets the idle speed. Consult your manual if needed.

  3. Warm Up the Engine: Let the engine warm up before making adjustments.

  4. Turn Idle Adjustment Screw: Turn the idle adjustment screw clockwise by half a turn. Listen to the engine and adjust to your preference.

  5. Listen and Readjust if Necessary: Listen for any rough sounds and make slow adjustments. Wait for about 30 seconds between turns.

  6. Replace Air Filter: Put the air filter back on and finish the job.

Main Jet Adjustment and Accelerator Pump

Two other things to note or possibly make changes to are the Main Jet size and the Accelerator Pump. The easy thing with the Accelerator Pump is with the engine off and the air cleaner off, snap the throttle body open. If the accelerator pump is working properly, you’ll see fuel squirt into the engine. 

As for the Main Jet Adjustment – this will be the last thing to check. This requires running the engine and then pulling the plugs to see what kind of condition they are in. However, you can install a wideband O2 sensor and gauge which will make adjustments easier. You want the plugs to be a milk chocolate color. Remember though, at idle the engine is running off the idle circuit. You need to get into the higher RPMs to really get a proper reading of the Main Jets. 

Tuning a carburetor isn’t a hard thing to do, it’s a matter of turning some screws. Knowing what to do and how to fix the symptoms you’re experiencing is the hardest part. The video above goes more in-depth with tuning and showing examples. You can always call our friendly techs at (203) 235-1200 for more help! 

Shop Carburetors And Parts

Follow Us On Social

Now Hiring in Florida!

Looking to get into the Automotive Industry? Here's your chance, click below to see what positions are opening soon!

Parts Catalog

Chevelle & El Camino, Camaro, & Nova
Free

We Want To See Your Car!

Submit your car to be featured today!

MORE ARTICLES FROM GROUND UP SS396.COM

1972 Nova
Customer Cars

John H’s 1972 Nova

John ended up buying this Nova for therapy after his wife passed away. It’s been a few years, and he says it was a great

Read More »
Customer Cars

Gerald H’s 1974 Nova

Gerald has owned this Nova since October of 1986, it was his first car, and he hadn’t even gotten his drivers’ license yet. When he

Read More »